Building and Installing from Source Code (Windows)
Preparation
To build and install Choreonoid from source code, you need to prepare the necessary tools and libraries for building in advance.
Required tools
Visual Studio (C++) 2019
CMake (3.21.3)
First, please install the above tools and libraries. The version numbers in parentheses are the versions we have used and confirmed to work, serving as a guideline as of September 2021. For libraries other than those specifying minimum versions, this does not necessarily mean that older versions are not supported, and conversely, newer versions may also fail to build. (Since it is difficult to accurately identify compatible versions, please understand this description.) Generally, if the first two numbers of the version are the same, they can be considered to work similarly.
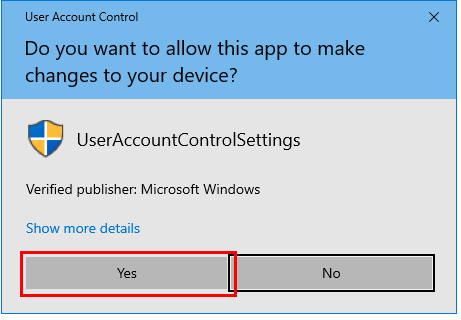
Supplementary information regarding the installation of each tool and library is provided below. Installation should be performed with an administrator account. Also, when a User Account Control dialog like the one shown below appears, click Yes to proceed.
Note
In previous versions, separate installation of the Eigen library was also required, but in the latest development version (upcoming version 1.8.0), the one included with Choreonoid’s source is used by default. In that case, there is no need to install Eigen separately.
Visual C++
Microsoft’s Visual C++ (the C++ compiler included with Visual Studio) can be used as the C++ compiler for compiling Choreonoid.
Visual Studio has several editions, and it is possible to download and use the free Visual Studio Community. The current latest version is 2019, and we have confirmed that Choreonoid can be built and run using it.
When you start the downloaded installer, a screen for selecting items to install will be displayed. Among these, make sure to check “Desktop development with C++”. When installation is complete, you will be asked to restart Windows, so please restart accordingly.
CMake
This is a tool for describing build methods. Choreonoid’s build method is described in this tool’s format, and on Windows it is possible to generate Visual Studio project files from it.
CMake can be obtained from the CMake download page. Installers for each platform (OS) are provided, and for use on Windows, use “Windows x64 Installer”.
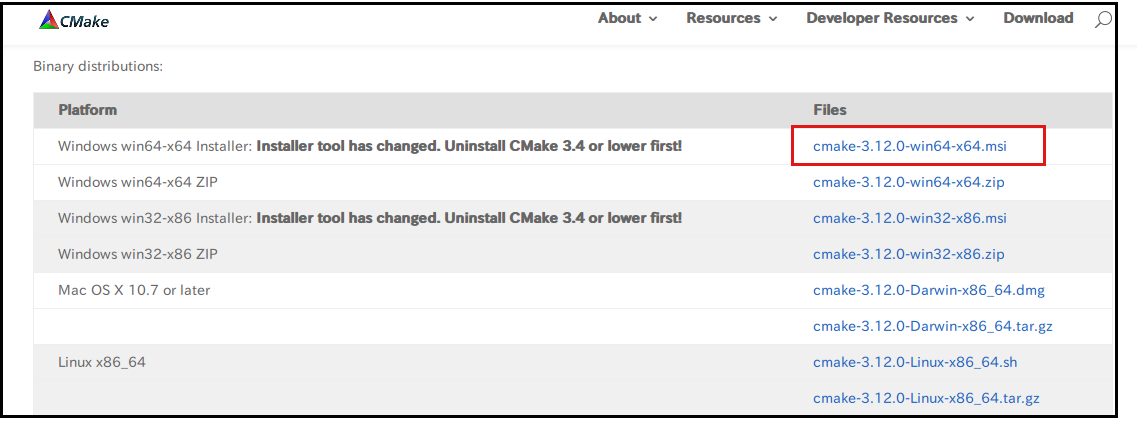
Click the corresponding cmake-x.xx.x-windows-x86_64.msi to download it, and run it to perform the installation. Follow the displayed messages to proceed, and
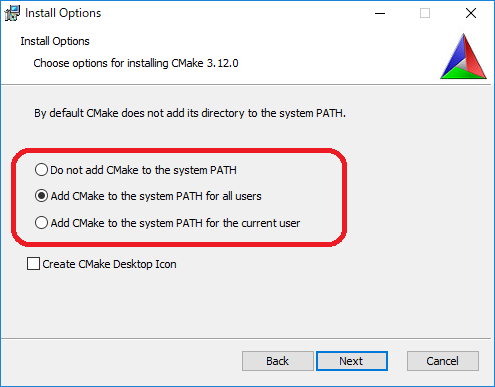
when you reach a screen like the one shown, select Add CMake to the system PATH for all users.
Other settings can remain at their defaults.
Boost
This is a collection of useful C++ libraries. Downloads can be made from the Boost Downloads page.
If you download the source, compilation is required. There are installers that include pre-compiled binaries for Windows, so using those is easier. On the above page, there is a link called Prebuilt windows binaries, so please open that.
Basically use newer versions, but new versions may fail to build Choreonoid. For reference, the latest version (not beta) as of September 2021 is 1.77.0, and we have confirmed that Choreonoid can be built and run with this version.
Click to open the folder for the version you want to download, and download a file like:
boost_1_xx_0-msvc-14.2-64.exe
Here “msvc-14.2” corresponds to Visual Studio 2019, and the final 64 indicates it is the 64-bit version. When using different versions, make sure to use ones with the same notation.
Installation can be performed by running the downloaded file. The default installation destination is a folder like “C:\local\boost_1_xx_0”. If you don’t change this, Boost’s directory will be automatically detected in the CMake configuration later. If you change the installation destination for some reason, you will need to manually specify the installation destination in the CMake configuration, so please be careful.
Qt
Qt is a comprehensive framework library including GUI, and Choreonoid also uses it as the base for GUI.
Qt’s installer can be obtained from Qt’s download page. There is an open source version available for free use, so use that unless there is a particular reason not to. Select “Download for open source users” to open the Download Qt Open Source page, then click “Download the Qt Online Installer” and download the installer from “Download” on the next page. (The process leading to this download may be somewhat different, but in that case please download using similar operations.)
When you run the downloaded file, you will be asked to log in with a Qt account. You can create an account with “Sign up”, so please create an account and log in to proceed with installation. Continue following the installer’s instructions to proceed with installation.
The default installation destination is a folder like “C:\Qt”. If you don’t change this, CMake will automatically detect Qt. If you change it, you will need to manually specify the folder, so remember it.
On the screen for selecting the Qt version to install, proceed with the default “Custom installation” selected.
Next you reach a screen for selecting components to install. Here you first select the Qt version, and unless there is a particular reason, use the latest version 5. As of April 2021, version 5.15.2 corresponds to this, and we have confirmed that Choreonoid can be built and run with this version.
Here you select the binary type along with the version. For this reason, expand the version number tree and check “MSVC 2019 64bit” inside it. Other components do not need to be included unless there is a particular reason.
Also, there is an item called “Developer and Designer Tools”, and when you expand that tree there is a CMake item that also appears to be checked. Since CMake is independently installed using the procedure described above, it may be better not to include it in the Qt installation to avoid conflicts with that. In that case, uncheck CMake.
Continue following the installer’s instructions to complete the installation.
Obtaining Source Code
Release Version
The source code for Choreonoid’s release version can be downloaded from the Download page. Please download the corresponding version from the “Source Package” on this page. The file is in ZIP format, so extract it to an appropriate directory using Explorer or similar.
When extracted, a directory like choreonoid-1.7.0 will be created. This directory contains the complete source code, and in this manual we will refer to this as the “source directory” from now on.
Development Version
The Choreonoid development version is also available. This is managed as a git repository and is published at the following address on github.
There are two ways to obtain source code from here:
Obtain as a Git repository
Obtain as a Zip file
Obtaining as a Git Repository
A Git repository is a form of source code management that includes the history of code changes. This has various advantages, and even when just using Choreonoid, it has the advantage of making it easier to update to the latest source code.
Git repository acquisition is usually performed using the git command. The Windows version of this command is packaged as Git for Windows.
To use this, please download the file from the Git for Windows official site and install it. The installation settings can basically remain at their defaults. If the screen shown below appears during the process, selecting “Use Git from the Windows Command Prompt” will set up the PATH to execute this command from the command prompt. Also, for “Configuring the line ending conversions”, if you plan to edit Choreonoid’s source code for improvements, please select the appropriate option considering the development environment you will use.

After installation is complete, open a command prompt, navigate to the directory where you want to save choreonoid’s source, and execute the following command:
git clone https://github.com/choreonoid/choreonoid.git
This will create a directory called “choreonoid” containing the repository. From then on, within this directory you can update to the latest source code at any time by running:
git pull
This completes source code acquisition. For detailed usage of git, please refer to git manuals and explanatory articles.
Note
Recent versions of Visual Studio allow Git-related operations to be performed in an integrated manner within the IDE. Those interested in this feature should refer to the Visual Studio manual.
Obtaining as a Zip File
Using a web browser, open Choreonoid’s repository and click the green Clone or download button shown in the red box to display the following:
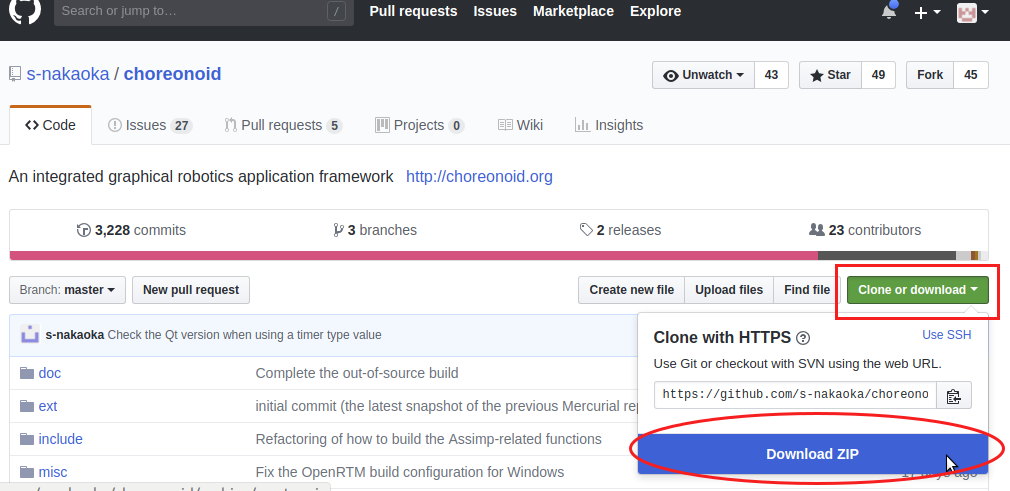
Click the blue Download ZIP shown in the red circle to download the latest content in Zip format. Extract the downloaded file to the directory where you want to place the source.
While this method is simple for initial acquisition, updating the source code requires downloading and extracting the Zip file again each time. When using a Git repository, updates can be performed with just the git pull command as described above, so the Git repository method is recommended for continuous use.
Build Configuration with CMake
First, launch CMake (cmake-gui) from the Start menu. This will display a dialog like the one below.
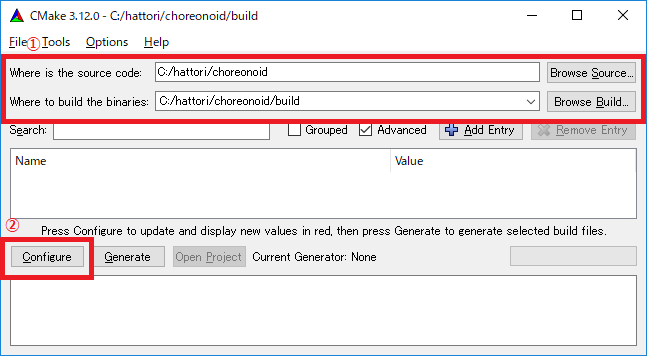
Next, enter Choreonoid’s source directory in the input box to the right of where is the source code shown in red box ①. You can also click Browse Source… to open a directory selection dialog and select from there. Next, enter the directory where you want to build Choreonoid in the input box to the right of where is build the binaries. The build directory can be the same as the source code, but that makes it confusing, so we’ll create a directory called build under the source directory and enter that. After entering, press “Configure” in red box ②.
If the build directory has not been created in advance, a confirmation dialog will appear asking whether to create it.
Next, a dialog like the one below will open. From the red-boxed pull-down menu, select the compiler.
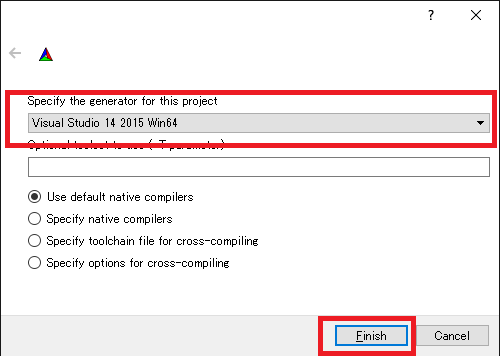
When using Visual C++ 2019, select
Visual Studio 16 2019 Win64
Below this item is an “Optional platform for generator” item where you can select the architecture. By default x64 is selected, which is fine.
Once the selection is complete, press the Finish button. CMake’s Configure will then proceed, detecting compilers, libraries, etc.
Note
At this time, messages like “The C compiler identification is unknown” and “The CXX compiler identification is unknown” may be displayed. In this case, the Visual C++ compiler is not being detected correctly. The cause is unknown, but this symptom has occurred in one of the developer’s environments. In this case, subsequent processing cannot proceed correctly.
For this issue, running CMake with administrator privileges resulted in the compiler being detected and subsequent processing being able to proceed. To do this, right-click the CMake icon and select “Run as administrator” from the menu. If this problem occurs, please try this solution.
Note
If a program called pkg-config.exe is installed on the Windows environment, errors may occur during this work. In such cases, please uninstall pkg-config.exe.
If you selected the default directories for library installation, the libraries should be automatically detected and Configuring done should be displayed on the last line as shown below.
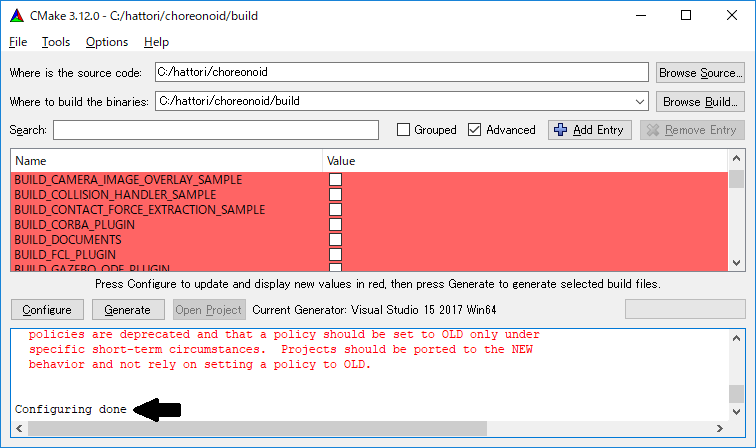
(If you installed to other directories, errors will probably be displayed. Configuration for that case will be explained later.)
Next, set the installation destination. Scroll the center display as shown below to display the CMAKE_INSTALL_PREFIX item.
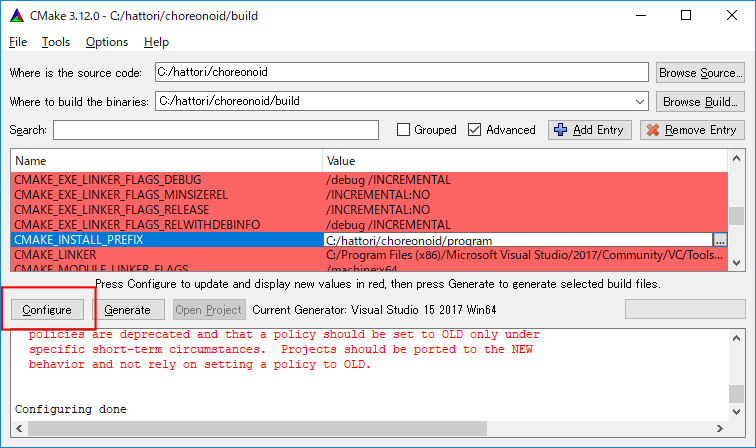
By default it is set to “c:\Program Files\Choreonoid”. However, on Windows, areas under “c:\Program Files” seem to be inaccessible to non-administrators, so installation may fail. You can run with administrator privileges and install there, but installing to another directory may be easier to handle in some cases. In that case, specify an appropriate directory like “c:\choreonoid\program” for CMAKE_INSTALL_PREFIX.
After completing the settings, press the Configure button and confirm that Configuring done is displayed again.
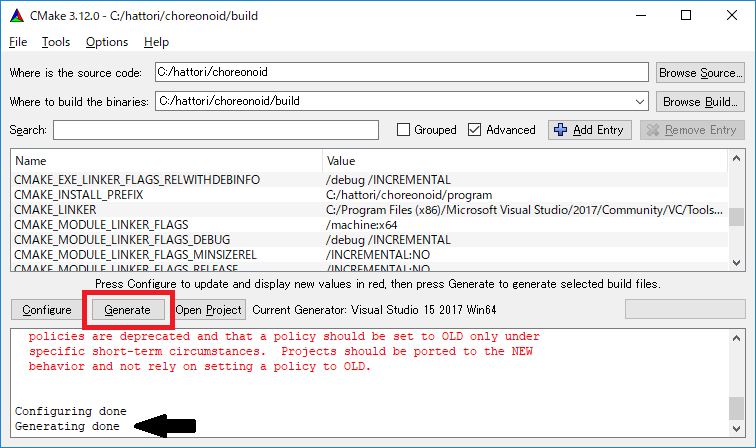
Next, to generate the Visual Studio project file, press “Generate”. If the “Generate” button is not enabled, press “Configure” again.
When solution file generation is complete, “Generating done” will be displayed in the message output section.
Next, we’ll explain the procedure for when error messages appear or when you want to change other settings. Those who have not seen error messages up to this point may proceed to Starting Visual Studio and Loading the Solution and read this section afterward.
If libraries could not be detected automatically, an error dialog like the one shown will be displayed.
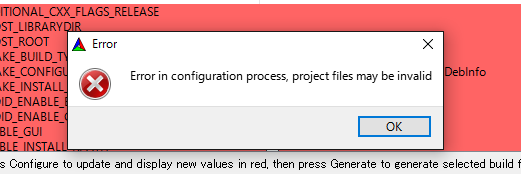
Press OK to close the dialog. Scroll through the message window in the lower section from the top to find where Errors are displayed. Ignore Warnings. Errors displayed lower down may be caused by errors above, so search from the top.
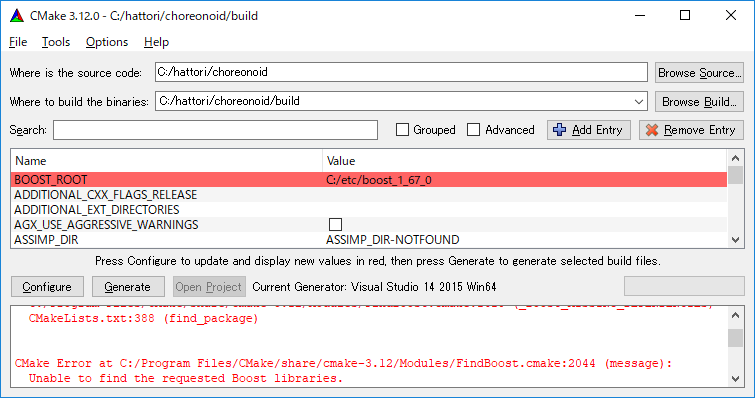
The figure below shows an error where the Boost library was not found.
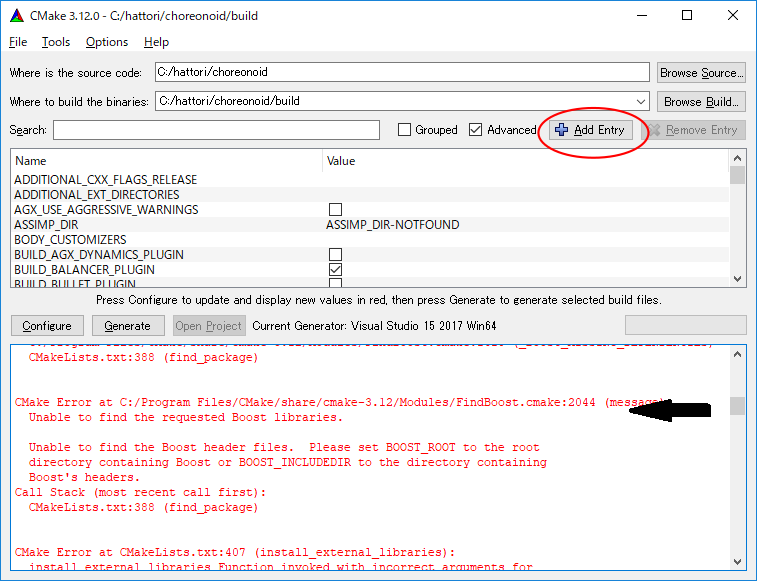
BOOST_ROOT is not present in the settings above. In this case, press the Add Entry button shown in the red circle. A dialog will be displayed, so enter as shown below.
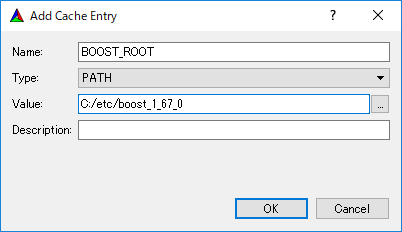
In the Value field, specify the Boost library installation directory. Press OK to close the dialog and confirm that BOOST_ROOT has been added as shown below.
Press the Configure button.
If errors related to QT5 are displayed, enter the location where the Qt5CoreConfig.cmake file is stored (probably in (Qt installation destination)/5.11/msvc201x_64/lib/cmake/Qt5Core) in Qt5Core_DIR. Errors are probably also displayed for other QT5 libraries, so enter them similarly. Warnings can be ignored.
After that, various other build-related options can be set as needed. For example, some features that Choreonoid has are turned off by default, but you can turn on the corresponding BUILD_ options as needed.
Repeat the same settings as above until all required library installation destinations are identified and no more errors occur.
After completing the necessary settings, press “Generate”.
Note
For other libraries as well, depending on the CMake version, installed library version, installation location, etc., they may not be detected and similar errors may occur. Also, errors may occur depending on the option selections explained below. The order in which errors appear may also change depending on the installation situation. In this case, find the error location in the same way as above and manually enter the installation destination.
Note
The configured content is saved as a file called CMakeCache.txt in the location specified by Where to build the binaries. If you want to start the configuration over from the beginning, delete this file. It can also be deleted by selecting File - Delete Cache from the CMake menu.
Note
Like Git, recent versions of Visual Studio also allow CMake operations to be performed within the IDE. Those interested in this should also refer to the Visual Studio manual.
Starting Visual Studio and Loading the Solution
Next, we’ll build Choreonoid.
Through the operations so far, the Visual Studio solution file Choreonoid.sln should have been generated in the location specified by where is build the binaries in CMake. Double-click this file.
Visual Studio should start and the solution file should be opened.
If Visual Studio does not start, there may have been an issue during installation, so try reinstalling Visual Studio or fixing the file association. Alternatively, you might first start Visual Studio and then load the solution file from Visual Studio’s menu.
The build operations for Visual Studio 2017 and 2019 are the same, so the following explanation does not specify which version. Therefore, screen designs may differ.
Compilation
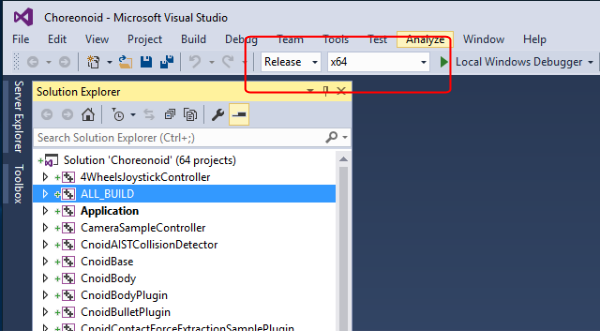
Once the solution has finished loading, you should see a screen like the one below. Here, change the red-boxed section to “Release” and confirm that x64 is displayed. Note that setting it to “Debug” allows you to generate debuggable binaries. However, these are dramatically slower compared to those compiled with “Release”, so except when debugging is necessary, use binaries compiled with “Release”.
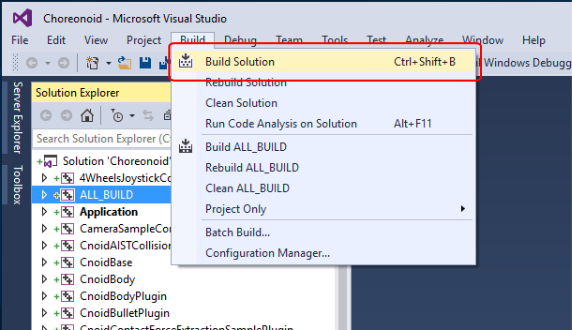
Next, execute Choreonoid’s build. Click the Build menu to display a pull-down menu as shown below, and select “Build Solution” as shown in the red box. This will start building Choreonoid. When “0 failed” appears at the end in the message window at the bottom, compilation is complete.
Installation
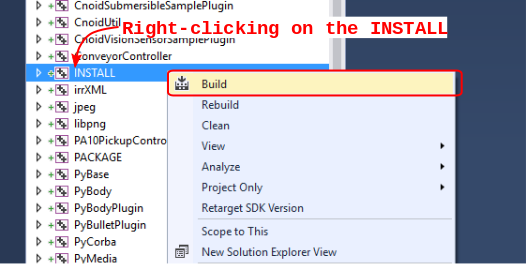
After Choreonoid’s build is complete, finally execute the installation. For installation, as shown in the figure below, right-click on the “INSTALL” project section in the “Solution Explorer” in the upper left to display a menu. At the top of this menu is “Build” (the red-boxed section in the figure below), so select that. If it completes normally, Choreonoid’s binaries will be copied under the directory specified by CMAKE_INSTALL_PREFIX during CMake configuration. If you checked the INSTALL_DEPENDENCIES item when generating the solution file with CMake, dependent library binaries will also be copied.
This completes Choreonoid’s installation.
Choreonoid can be started by double-clicking choreonoid.exe in the bin directory of the installation destination.
Building Optional Features
In addition to what is enabled by default in the above procedure, Choreonoid has several other modules, plugins, samples, etc. These can be built by enabling them in CMake configuration. Here we describe building some of these optional features. Other options are also summarized in Optional Features, so please refer to that as well.
There, installation methods for libraries used by each plugin are also briefly explained. However, they may have changed significantly due to library version updates, and links may have changed due to updates to the developer’s homepage. In such cases, you should be able to find new information by searching the internet using keywords like the library name and “installation”.
Note
After configuring optional features in CMake and pressing the Configure and Generate buttons, the solution file will be updated. By compiling and installing with Visual Studio using this file, optional plugins will be generated. After making option changes in CMake, be sure to perform compilation and installation work.
Assimp Plugin
This is a plugin for using the Open Asset Import Library (Assimp) library for reading various formats of 3D model data in Choreonoid. To use this plugin, you need to build and install the Assimp library from source.
First, download the source code from the Downloads page on the official Assimp site. The latest version as of September 2021 is 5.0.1, and operation has been confirmed with this version. A zip archive containing the complete source code is provided, so download and extract that.
Like building Choreonoid, CMake is used for building Assimp. Operate CMake in the same way as building Choreonoid to generate Visual Studio project files and perform the build. The CMake options can remain at their defaults without problems.
However, care is needed regarding CMAKE_INSTALL_PREFIX which specifies the installation destination. This item defaults to c:\Program Files\Assimp, but installing to this directory requires administrator privileges. To achieve this with installation from Visual Studio, you need to start Visual Studio with administrator privileges. While there’s no problem with the default installation destination if you do this, changing the installation destination allows installation without running with administrator privileges. In that case, set CMAKE_INSTALL_PREFIX to c:\local. With this setting, automatic detection of Assimp will be enabled when building Choreonoid itself, just like with the default installation destination.
Build and installation operations using Visual Studio should be performed in the same way as for Choreonoid. However, you need to build and install both Debug and Release build types. (If you don’t do this, errors will occur when using Assimp from CMake.) These cannot be processed simultaneously, so first specify Debug and perform build and installation, then switch to Release and perform build and installation.
If Assimp is installed, Choreonoid’s Assimp plugin can also be built. If you build Choreonoid with Assimp already installed, just build Choreonoid using the normal method. In that case, Assimp will be automatically detected when running CMake for Choreonoid, and the Assimp plugin will also be built.
If you have already built Choreonoid and want to install Assimp additionally and enable the Assimp plugin, you need to rebuild Choreonoid itself. In that case, configure the ASSIMP_DIR and ENABLE_ASSIMP items in Choreonoid’s CMake settings.
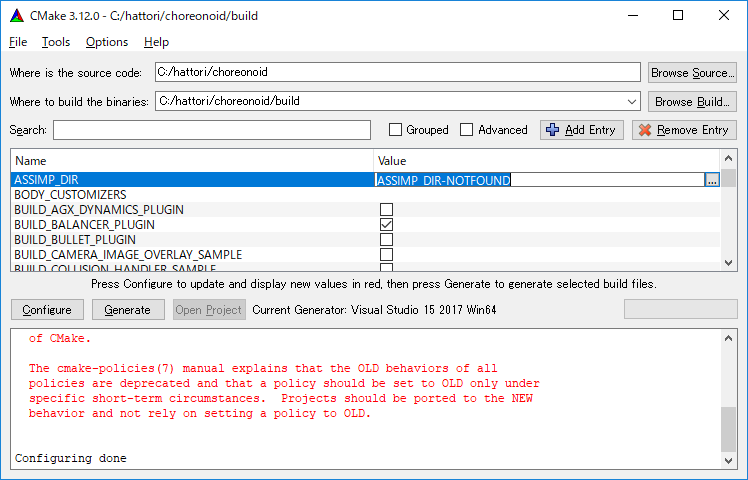
As shown in the figure, the value of ASSIMP_DIR is probably displayed as ASSIMP_DIR-NOTFOUND.
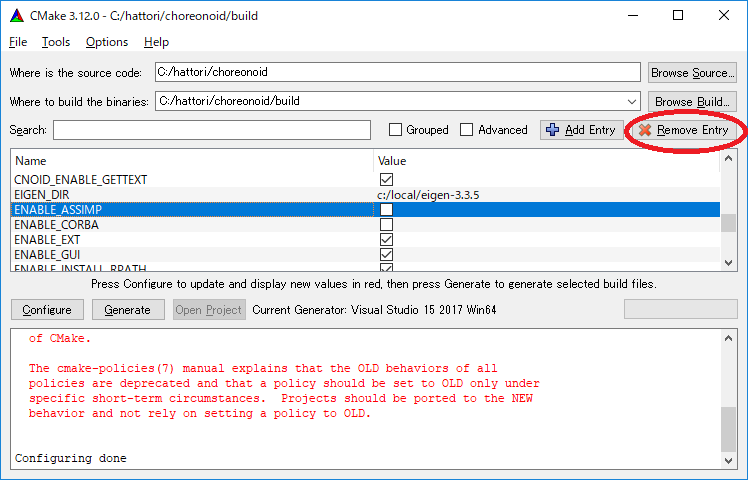
There is an ENABLE_ASSIMP item further down, so select this and press the Remove Entry button to delete this item. After that, press Configure and Assimp should be automatically detected.
If automatic detection fails, set ENABLE_ASSIMP to ON and manually enter ASSIMP_DIR. At this time, you need to specify the directory containing Assimp’s CMake files, not the top directory of Assimp’s installation destination. It should be in installation destination\Assimp\lib\cmake\assimp-5.1.
After that, follow the choreonoid build procedure.
Media Plugin
This is a plugin for playing media files. Turn BUILD_MEDIA_PLUGIN ON in CMake.
Depending on the media file format, some files like MPEG-4 files may not be playable, but this can be resolved by installing codec packs that support the file formats. Codec packs can be found quickly by searching online for free ones, but some may affect other video software, so we don’t specify any particular one here. Please use one that suits your system.
ODE Plugin
This is a plugin that enables the open source physics calculation library “Open Dynamics Engine (ODE)” to be used as the physics engine for Choreonoid’s simulation functionality.
To build and use this plugin, installation of the ODE library is required. Pre-built libraries do not seem to be publicly available, so you need to build from source. Follow the links from the Open Dynamics Engine site to download the relevant files. As of October 2021, you can download the latest source archive ode-0.16.2.tar.gz from the download page in Bitbucket. The following explanation assumes this version.
This file is a tar.gz format archive, so first extract the file. To extract on Windows, you need software for that purpose. For example, you can use software like 7-Zip, so use such software to extract the file.
ODE can also be built using CMake. This can be done in the same manner as Assimp above, so please refer to that as well. Like Assimp, the default installation destination is c:\Program Files\ODE, and you can install there using administrator privileges, or you can change CMAKE_INSTALL_PREFIX to install to c:\local\ODE.
For other CMake options, the defaults are basically fine. Building the release version generates library files called ode_double.lib and ode_double.dll. For the debug version, they become ode_doubled.lib and ode_doubled.dll. If the complete set of library files including these files and header files are stored in the installation destination, ODE installation is complete.
After that, in the CMake settings for building Choreonoid, set the BUILD_ODE_PLUGIN item to “ON”. This will detect ODE’s installation destination and set it in ODE_DIR, while also configuring the information necessary for building the ODE plugin. If ODE’s installation destination cannot be detected, an error message will be output and ODE_DIR will also be blank. In this case, manually configure ODE_DIR.
Python Plugin
This is a plugin for using functionality such as loading and executing Python scripts and a Python console that runs on Choreonoid.
To build and use this plugin, Python installation is required. If not yet installed, download “Windows installer (64-bit)” from the Python official site’s Windows download page and perform installation.
The latest Python version confirmed to work as of April 2021 is 3.9.4. Note that while Python2 may still be usable, since most environments have already migrated to Python3, we are no longer performing operation confirmation targeting Python2. If you absolutely need to use it, please refer to manuals for previous versions of Choreonoid.
When you start the installer, you will see a screen like the following:
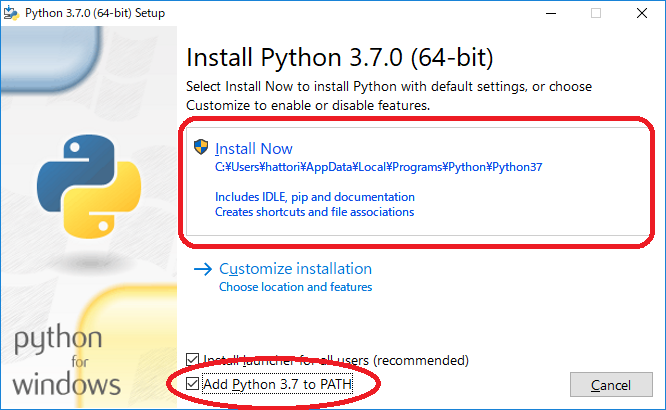
Here, usually check Add Python 3.x to PATH. Then click Install Now to perform installation.
To use the Python plugin, you also need Numpy, a numerical calculation library for Python, so install that as well. This can be done by executing the following command from a command prompt after installing Python:
python -m pip install numpy
After Numpy installation is complete, open CMake for Choreonoid again and turn
ENABLE_PYTHON
ON.
Note
If PATH is not set for Python3, you need to set PATH when starting choreonoid. Preparing a batch file that contains:
set PATH=(Python3 installation destination);%PATH%
choreonoid
and executing this would be simple.
Plugin Uninstallation
Plugins installed by turning BUILD_XXX_PLUGIN options on will not be removed even if you later turn the options off and install. If you want to remove plugins, such as when plugins become unstable after addition, manually delete the files. Plugins are installed as Cnoid***Plugin.dll in (Choreonoid installation destination)/lib/choreonoid-1.7.