Step 6: Simulating and Obtaining Camera Images
The Tank model is also equipped with a camera. In Step 6, we’ll enable simulation of this camera and learn how to obtain camera images from the controller side.
The project created in Step 5 contains various visual elements, so let’s proceed with this step starting from the state set in that project. First, save the project again with the name “Step6.cnoid” and proceed with the work in this step.
Camera Device
Similar to the light handled in Step 5, the camera is also defined as one of the “devices” in Choreonoid. The camera mounted on the Tank model is named “Camera”, and devices can be identified by this name. The access method from the controller is the same as for other devices including lights.
For how the camera is actually defined in the model file, see Writing the Camera in Creating the Tank Model.
Changing the Camera in the Scene View
The scene view can also display from the viewpoint of a camera mounted on a robot model. Using this function, let’s first check what kind of images can be obtained from the camera mounted on the Tank model.
Camera switching can be done with the “Camera selection” combo box on the scene bar below.

Clicking here displays a list of cameras defined in the system and cameras included in models displayed in the scene. In the current project state, the following should be displayed as options:
Perspective - System
Orthographic - System
Camera - Tank
“Perspective - System” and “Orthographic - System” are cameras that the scene view has by default, allowing users to change the viewpoint through mouse operations. They are cameras that perform perspective projection rendering and orthographic projection rendering respectively, with Perspective selected by default.
“Camera - Tank” is the camera named “Camera” mounted on the Tank model. Since we want to display the scene from this camera’s viewpoint, let’s select this. Then, depending on the direction the Tank model is facing and the scene view’s rendering settings, an image like the following should be displayed in the scene view:
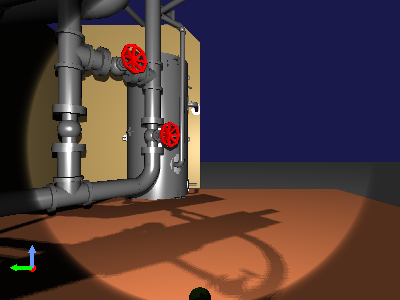
Start the simulation in this state and try operating the Tank model with the gamepad. You should see the image moving in conjunction with the Tank’s movement and turret motion. This is the video from the camera mounted on the Tank model.
Note that in simulations, you may want to display both such camera images and overhead views from the original scene view display simultaneously. This is possible in Choreonoid by adding and displaying additional scene views, so let’s try it.
From the main menu, select “View” - “Create View” - “Scene”. This displays the “Generate SceneView” dialog. Here you can set the name of the view to add, but if there’s no particular name you want to specify, the default is fine. Pressing the “Generate” button here generates an additional scene view and places it on the main window.
The location where views are generated is determined for each view type, and this time the additional scene view will probably be displayed overlapping the area where the original scene view was displayed. You can switch to the original view by operating the tabs, but this doesn’t achieve simultaneous display. To display simultaneously, perform the Moving Views operation to move the additional view to another area on the main window.
Once you’ve moved the view, also switch the camera used for rendering. Each scene view’s camera can be switched independently. In this case, scene bar operations are applied to the scene view that last had focus, so first click the mouse on the original scene view area to give it focus, then select “Perspective - System” in the scene bar’s camera selection combo. Next, similarly give focus to the added scene view and select “Camera - Tank” in the camera selection combo. Also adjust the position and size of each view to make them easier to see. Through such operations, you can achieve a display like the following:
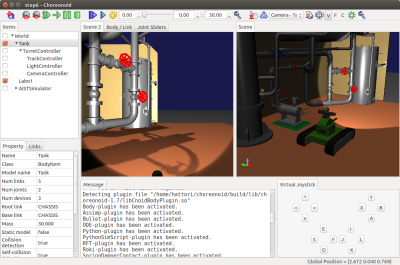
Here, we’ve placed the added scene view on the left side to display the Tank model’s camera image, and the right scene view displays an overhead view with the default camera.
Simulating Camera Images
We were able to display camera images using the scene view. However, this is for rendering on the GUI and is a function independent of simulation. In fact, you can see that camera image rendering is possible even without starting the simulation. To obtain camera images from the controller in simulation, you need to also simulate camera images as a device.
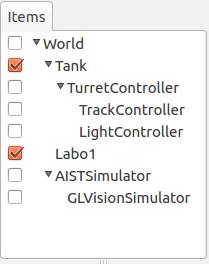
To do this, you need to introduce a “GL Vision Simulator Item” to the project. Generate this item from the main menu’s “File” - “New” - “GL Vision Simulator” and place it as a child item of the simulator item. This results in the following item configuration:
When you run the simulation in this state, camera images are simulated inside the simulator, making it possible to obtain them from the controller.
For details on the GL Vision Simulator Item, please refer to Vision Sensor Simulation.
Controller Source Code
With the introduction of the GL Vision Simulator Item, we can now simulate camera images, but to confirm this, we need a controller to obtain images from the camera device. Here we’ll create a controller that outputs the obtained images to files. The source code is shown below:
 1#include <cnoid/SimpleController>
 2#include <cnoid/Camera>
 3#include <cnoid/Joystick>
 4
 5using namespace cnoid;
 6
 7class CameraController : public SimpleController
 8{
 9    Camera* camera;
10    Joystick joystick;
11    bool prevButtonState;
12    std::ostream* os;
13
14public:
15    virtual bool initialize(SimpleControllerIO* io) override
16    {
17        camera = io->body()->findDevice<Camera>("Camera");
18        io->enableInput(camera);
19        prevButtonState = false;
20        os = &io->os();
21        return true;
22    }
23
24    virtual bool control() override
25    {
26        joystick.readCurrentState();
27
28        bool currentState = joystick.getButtonState(1);
29        if(currentState && !prevButtonState){
30            const Image& image = camera->constImage();
31            if(!image.empty()){
32                std::string filename = camera->name() + ".png";
33                camera->constImage().save(filename);
34                (*os) << "The image of " << camera->name()
35                      << " has been saved to \"" << filename << "\"."
36                      << std::endl;
37            }
38        }
39        prevButtonState = currentState;
40
41        return true;
42    }
43};
44
45CNOID_IMPLEMENT_SIMPLE_CONTROLLER_FACTORY(CameraController)
As before, save the above source code with the filename “CameraController.cpp” in the project directory.
Add to CMakeLists.txt:
choreonoid_add_simple_controller(TankTutorial_CameraController CameraController.cpp)
and compile it.
Introducing the Controller
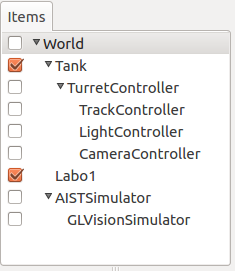
As before, introduce the created controller to the project using a SimpleController item and place it as a child item of the TurretController. This results in the following Item Tree View:
Obtaining and Displaying Camera Images
Now let’s run the simulation.
As a function of the Camera controller, pressing the B button on the gamepad or virtual joystick view (the ○ button on PlayStation gamepads) saves the current camera image to a file. At this time, the message view displays:
The image of Camera has been saved to "Camera.png".
The file is saved in the current directory with the filename “Camera.png”.
Try pressing the button and display the saved image file with an appropriate image viewer. On Ubuntu, there’s a standard image viewer called “eog”, and you can display the obtained camera image by entering on the command line:
eog Camera.png
etc.
eog seems to have a function that updates the display when the loaded image file is updated. This allows you to confirm that the obtained image is updated each time you obtain a new image while keeping eog displayed.
Explanation of Implementation Details
Similar to the light in Step 5, in the initialize function:
camera = io->body()->findDevice<Camera>("Camera");
obtains the device object corresponding to Camera and stores it in the camera variable.
Also:
io->enableInput(camera);
enables input from this device. This description is necessary when performing input from a device.
Note
For output from devices, as explained in Step 5, it’s done by executing “notifyStateChange()” on the device. Therefore, functions like enableOutput() are not provided for devices, so please be aware of this.
The control function checks the state of the B button, and when the B button is pressed, it saves the Camera device’s image at that time to a file. In this process, first:
const Image& image = camera->constImage();
obtains the Image type image data that the Camera device has. If this is not empty:
camera->constImage().save(filename);
saves the image directly to a file.
In an actual controller, you would perform image recognition processing on this image data, or send the obtained image to a remote operation terminal, among other processes.